Wednesday, June 2, 2010

Today on 'As the Garden Grows'

We return with our usual cast of characters...

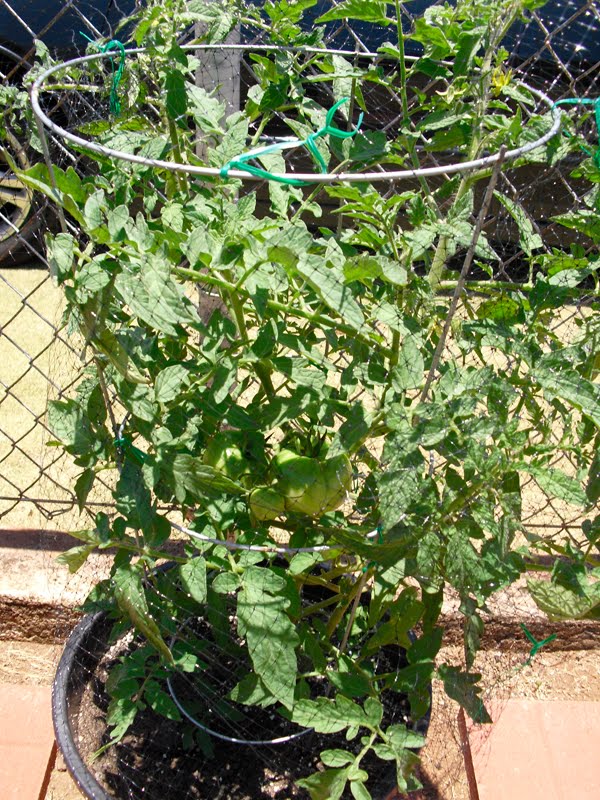
First up, the growing competition between the tomato twins.  Who will be the victorious winner of first ripe tomato?  We'll just have to wait and see.  At this point they're neck-and-neck with 7 tomatoes each.
Fettuccine is growing strong.  Pretty much busting right out of her bird block wrap.  She has a sweet pair of tomatoes and wants to flaunt them.  I mean if you have them, then why not right?
Formaggio is also getting quite large in size.  All that fertilizer loading is really doing her some good.  She also has a few tomatoes and wants to flaunt them...just not as badly as Fettuccine.  She's the more reserved twin.  (It took a lot of coaxing to get that second picture.)  Let's just say that Formaggio is a little bit more of the "Hello Sports Bra" type rather than the "Hello Bombshell" type.  Hey some of us are a little more shy than others.
Finally the flower bed.  Kind of a Monet if you know what I mean.  ("From far away it's okay, but up close it's a big old mess."  Clueless, anyone?  There I go dating myself again.  Yes I loved that movie and I still do.  Yeah I said it!)  In the flower bed's defense the house was recently fumigated, so gas fumes+dog trampling= dead flowers.  Needless to say she's in the ICU on growth hormones for now.

Oh the suspense!  Tune in next week for more on 'As the Garden Grows'.

Tuesday, June 1, 2010

To paint or not to paint, that is the question...

As most of you now know, faithful blog followers (Hehe...I have you in my clutches now!), I have the attention span of a five year old.  Last month it was cards, last week it was cooking, yesterday it was gardening, and today it's painting.  My inner artist, she longs to be free!  Or at least portrayed on an extremely larger-than-my-husband-would-like-it-to-be canvas...lol.

I love abstract mixed media art in large sizes.  Exactly the kind of artwork that my husband doesn't understand...lol.  But that's why I love him.  He likes sleek lines and sharp edges and I like soft curves and sketched lines.  He likes the plain and simple and I like the over stuffed and complex.  Despite our differences, he's my lobster and we'll mate for life.  (Friends reference, anyone?  Maybe I'm dating myself with the lobster comment...lol.)

I'm going to try and fight the painting urge for one more day.  We'll see how long that lasts.  I'm supposed to be learning Italian right now, but instead I'm here blabbing on about wanting to paint.  See what I mean about the attention span? 

Italian lesson of the day: Le bambine stanno camminando.
Translation as far as I can tell via the picture on my Rosetta Stone: The girls are walking together.

Monday, May 24, 2010

Mother's Day Shadow Boxes

I know that I am about a month late posting these, but in my defense they were all completed on time and were all gifts...some to people that read my blog.  So you see I couldn't post it until after Mother's Day anyways or else I would have ruined the surprise.  But you're right I'm still late at posting them...lol.  Sue me.

I made shadow boxes of all the kids at my Mom's daycare for each of their mommies.  They turned out super cute!  Of course all the moms loved them...because who can resist a picture of their baby?


*Mini confession: I must confess that mixed media pieces will always have a special place in my heart.  I love paper just by itself, but I think that it really comes alive when you add other types of materials.  (Speaking of mixed media art, Shawn Ardoin is an awesome mixed media artist.  His pieces speak to me.  Love his color and material choices!  One day one of his mixed media pieces will be mine!  Oh yes, it will be mine.)  Okay that's enough of that...I can't let you know all my secrets.

I tried to play on the interest of each kid, which is why each box is different.  They each have their own little personalities and they don't let you forget it!  Enjoy and I hope that this inspires you to make your own mixed media shadow box.  Don't forget to think outside of the box! :)

Tuesday, May 18, 2010

You could be a farmer in those clothes!

The "gardening experience" can be a little much at times...such as when I've "ran" to the hardware store for the third time in one day or when a huge black bumble bee chased me through the yard!  (I still can't get that buzzing sound out of my head.  Also, I find that I am constantly looking for him every time I step outside.  I know that I am bigger than him!  Irrational, yes, but aren't we all?)

So as promised, here are the up-to-date garden photos:
These are the flowers that I first blogged about.  They are growing nicely....or at least the part closest to the camera is.
 This part is all full and healthy!  Looks like a real flower bed should.
This part, on the other hand, looks like poop!  How could this happen?  How could flowers growing in the same flower bed look so totally different?  Same amount of water, sunlight, and love.
This is how.  Meet my Mom's dog, Reese.  Reese is a strange one.  He likes to blend into the background.   He likes to blend so much that he hides in the bushes near this flower bed.  (It actually took me a good ten minutes to get this picture.  He was hiding in the bushes and I had to pull him out.  Then I got this look...lol.)  In order to get in or out of his favorite hiding place, yup you guessed it, he walks through my flower bed!  Some times I see him just standing in it!  Just standing there oblivious to the fact that he is trampling my flowers.  It's a good thing your cute Reesey...

Anyways...

Yesterday I was busy re-potting tomato plants and a few herbs.  They were getting too big and needed more room to spread out.  I think that I waited a little too long because when I took them out of their original pots their roots were showing so much that they took on the shape of the pot.  I think that they were getting ready to find their own new pot...lol. 
So here are my supplies: Miracle Grow potting soil that feeds plants up to 6 months I think (pretty good since I forget to fertilize all the time, plus it makes them grow to monster size), new pots, tomato cages, and the gardening gloves that always turn my hands orange.  Note: If anyone finds a cute pair of pink gardening gloves that don't have lady bugs, flowers, or anything that screams "I'm a crazy cat lady with no friends", please let me know.  I'm getting real tired of orange hands and I deserve to look cute while gardening, right?
Don't wear jeans to garden in unless you want to look like this.  Valuable lesson learned.
 This is me hard at work.   It was really hot yesterday and this is post running from the bee.
Here's everyone in their new pots!  Happy as can be. :)
Me after everything is done.  Hooray!

Monday, May 17, 2010

More card pictures!

Okay so here are the pictures of the two remaining cards...hey I have to keep some things a secret!  If you want to know ahead of time then you need to come to the class...hehehe. :)

I am totally in love with this card!  When I was making it I wanted to keep adding more and more and more things to it, but I'm glad that I kept it simple.  You all know how I can go overboard.  And look!  No bling!  It was hard to do, but I didn't add any...in fact I managed to have all the cards be bling-less.  *Gasp!*  Shocking isn't it?!?  I know!

Here's the gift card holder.  Cute and sweet.  I saw that Becky Roberts put her scallop circle behind another paper instead of directly behind the circle, like I normally do, and I thought it looked kind of cool.  You know, just something different.  I'm not sure if it is a technique that I will totally adapt forever, but  I think that it adds a little attitude.  It says "Yeah I know that I might not belong here traditionally, but I'm doing it anyway.  Watcha gonna do about it?  Yeah that's what I thought."  Lol. :)

Enjoy your Monday!  I'm going outside to do a little gardening...and work on my tan a wee bit.  Multitasking at it's finest if you ask me!  I'll take some pics to update you all on my garden progress.

Monday, May 3, 2010

May 16, 2010: "Congrats Grad" the Card Edition

This month's Stampin' day will take place on May 16th at 1pm. 

We'll be making five super fab graduation cards!  I love graduation cards.  It's the one time that people really enjoy getting cards versus presents...lol.  Plus they are a lot of fun to make.  Here are the pictures of three of the five cards.


 Becky Roberts did a card like this one and I loved it so much that I had to put my own twist on it.  Simple and oh so cute!

Here's more owls...lol.  I love them...with their little glasses.  It's nerdy-chic!

 My favorite is of course the card with the graduation hat!  (Thanks Kim Sinclar for the great idea!)  The best part is the hidden pocket for money or a gift card.  Too cute for words!  

The class fee is $20, which includes your kit with pre-cut pieces, all shared supplies (stamps, scissors, etc.), and a super yummy snack.  Don't forget to bring your own double-sided sticky tape and any other supplies that you think you'll want to use (ie. scissors, punches, etc.)!  Please RSVP to me by Monday, May 10th


Don't be shy!  Encourage a friend(s) to come along.  More girls means more ideas and more fun shared together!  Just be sure that they RSVP to me or you can RSVP for them.  Also, if you are unable to attend, but still want to do the class you can purchase a kit.  Just add $5 for shipping and handling.  Looking forward to seeing you all!

Stampin' and smilin',
          Arielle

PS.  I know that May is supposed to be National Scrapbook month, but since graduation comes so early in Hawaii I opted to do the graduation card class first.  So for all you scrappers, I promise that I'll have a great scrap class next month.  Just sit tight. :)

Buttercream Frosting Mayhem

Okay so you all have seen me make this frosting a few posts back...and it came out perfectly fine the first time, but since then my frosting endeavors have been a total disaster.  Apparently a few of you had problems with the frosting as well...so I called in the big guns..."MOM!  Help me, please!"  If Mom can't fix it, no one can.

Of course, she fixed it with the cooking ease and grace that can only be possessed by my mother...lol.  I took pictures to make sure that we all had step-by-step instructions.  So here it goes... The best frosting that I've ever had take 2:
When your milk and flour mixture thickens it should look like this.  Once it thickens to this consistency be sure to remove it from the heat or else it'll get lumpy and over cooked.  Plus it needs to cool down to room temperature before you can mix it into the butter and sugar mixture.  (If you jump the gun, like I have, you'll end up with a pool of melted buttery shlop...not pretty for frosting.)  Tip:  DO NOT walk away from the stove when you are doing this!  It needs constant supervision and stirring.  Don't answer the phone or the door or anything.  If you really need to tend to something else (ie. your kid is starting a small fire in the living room), take your pot off the stove and go back to it once you are finished.  I'm serious!

This is what your whipped butter and sugar mixture should look like when it is all finished.  You need to whip the butter and sugar together until there are no granules of sugar left in the mixture.  It should be relatively smooth with the sugar melting into the butter for a nice creamy consistency.  Mom opted for the paddle attachment for this process.  I think it worked out well, but I'm sure that the whisk attachment would have worked as well.  Tip:  Once this is finished put it back in the fridge while the flour mixture is cooling.  It needs to be cold when the flour mixture is whipped in.

Once everything is cold (butter mixture) and cooled (flour mixture), beat the two together for a minute until it looks like whipped cream.  It shouldn't separate or get all running...if you followed my tips and directions carefully...lol.  If it doesn't come out exactly as planned, add in a block of cream cheese.  That has saved my frosting disasters in the past. :)

Thursday, April 22, 2010

I like it hot! Just a little something to spice up your Thursday!

You know what they say.  "If you can't stand the heat, get out of the kitchen!"  (Side note: Did you know that the originator of this quote was Harry S. Truman?  Don't say you didn't learn anything from me!)  As far as chili goes, I like it hot (spicy that is, though I don't want to eat cold chili so temperature hot is needed as well).  Spicy is where it is at!

If I'm being honest, I like a lot of food spicy.  The spicier the better.  If it's not burning your lips, then it's not hot enough...lol.  The need for spice has kind of been a recent development in my palate, maybe over the last year or so, much to my husband's dismay.  He likes food to be spiced more on the lukewarm side, but he's trying his best to keep up with me.  He told me that he is actually scared at how hot our food will have to be to satisfy me when I become pregnant...lol.  He's too cute. :)

Anyways...I decided to make chili this afternoon for tonight's dinner. (Hey the best chili needs time to rest.  Ever notice that chili tastes better the next day?  That's because the flavors have had time to meld together and get all super yummy.)  I usually use that McCormick Original Chili Seasoning and add to it, but I didn't have any on hand and I was too lazy to make a trip to the store...lol.  So I Googled around and found a recipe that sounded similar to what was in the seasoning mix.  It took a little tasting and additions here and there, but I think that I have perfected it!  Drum roll please....


Now that is what I call chili!  Yum-o fo' sho! :)  I know you all want the recipe.  Since I'm feeling spicy and because I love you, I'll share it...lol.

Arielle's Chili
1 lb ground beef or turkey (turkey is usually sold in 1.25lbs, which is fine.  Just throw it all in.)
2 Louisiana Hot Links, cut into small pieces
1 medium onion, chopped
1/2 green bell pepper, chopped
3 cloves of garlic, minced
1 16oz can tomato sauce
1 16oz can kidney beans
2 Tbs chili powder
1 Tbs flour
1 tsp salt
1/2 tsp paprika
1/2 tsp ground cumin
1/2 tsp sugar
3/4 cup frozen corn (optional)
3/4 cup mushrooms, chopped (optional)
Chalulas hot sauce, to taste (optional)

Brown beef (or turkey), sausage, onion, bell pepper, and garlic.  If using beef, drain.  Stir in the dry ingredients, tomato sauce, and kidney beans.  Bring to a boil and reduce to a simmer.  Simmer for 20 minutes.  Add in the corn, mushrooms, and hot sauce to taste.  Simmer for about 10 more minutes.

Serve over rice and top with shredded cheddar cheese.  Take a bite and realize what has been missing in your life!  No more Zippy's chili for you, this is the major leagues now!

*You can control the heat by how much or how little hot sauce you add in.  If you are feeling REALLY spicy, you could chop up a few jalapenos and throw those babies in.  Now that's spicy!

Wednesday, April 21, 2010

Flirty Little Flowers

In the spirit of Earth Day (which is tomorrow people!)...and because my Mom told me to...I spent my 'down time' (aka. nap time for the kiddies at her daycare) today planting her new flower bed.  I'm not going to lie.  I'm not one of those people who loves to get dirty and sweaty, especially not sweaty, outdoors.  I like the idea of gardening, but am in no way a gardener.  The closest I get to gardening is going to the farmers market and buying locally grown produce...lol.

Don't get me wrong, I've tried...but the poor plants usually die a slow and painful death.  I've over-watered, under-watered, forgot-to-water, over-sun exposed, under-sun exposed, etc., etc.  many plants to their untimely deaths.  So as far as I am concerned, gardeners who can get plants to grow for any large chunk of time must possess magical powers.

But look!  I did it!  The rows of flowers even seem to look straight. :)  I planted impatiens.  Partly because the name (Haha to the play on words there) and partly because they are supposed to be easy to grow...we'll see about the latter.  Also, they are dirt cheap!  At only $0.89 each, if they pass on to plant heaven I won't feel so bad.


Okay time for a close up.  Look how cute they are!  So springy and fresh looking.  Plus they come in a ton of shades of pink!  My kind of flower.


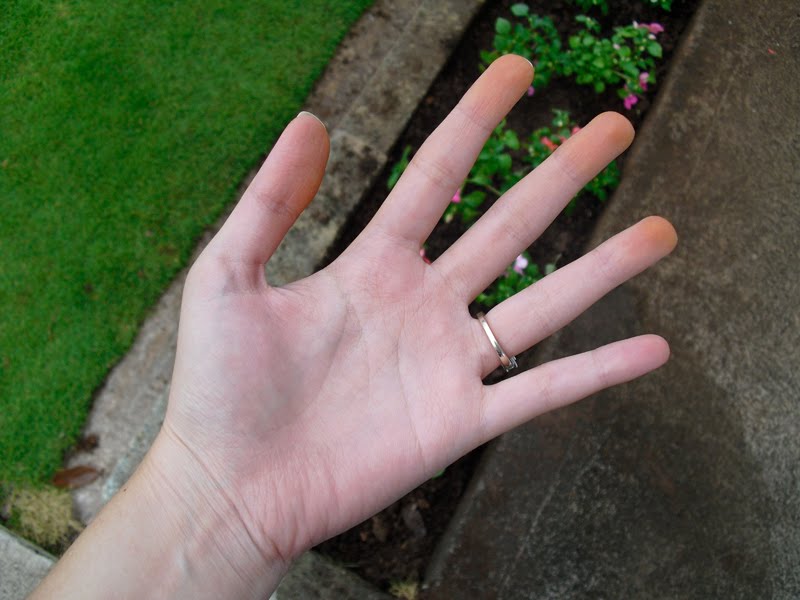
Here's a picture of my hand, excuse the pastie whiteness it's been awhile since I've seen the beach, to prove that I really planted them.  My fingers are orange from the gloves I was using...lol.  I'm actually surprised that there are no ink stains on my hand from stamping.

Hmmm...if this flower bed works out, maybe I'll consider trying to garden again.  I really want to grow a veggie and herb garden.  (I must confess that I do have a rosemary and oregano plant right now.  Thanks Teri's Dad!)  Fresh veggies and herbs make the best dishes!  If I take up gardening I'll most certainly need a pair of wellies to garden in, right?  I did have my eye on a pair of Dooney and Bourke wellies.  If I want to be successful I'll have to have the right tools!

Monday, April 19, 2010

Can she build it?!? Yes, she can!

This, my friends, is my masterpiece!  It is my castle!  I poured my blood, sweat, and tears into building it.  And when I was done there was no applause; no gasp of astonishment at the shear beauty that it exudes.  Only silence and then the question, "Can I knock it down?"  (Can you believe that?  Ludicrous.  That's what that is.)  My reply was, "Can you knock it down!?!  Yeah, I guess so, but let me get a picture of it first."   As soon as the picture was taken, my nephew's face took on a Godzilla-like appearance.  He let out a squeal and charged right into my castle.  All the blocks came tumbling down.  Then he said, "Can you build another one?"  No one appreciates good art any more.  Especially not six year olds... :)

*Photo Update* April 2010 Class: Purse-fection!

Here's the final purse version.  The flower on the front really adds something don't you think? (Sorry that this pic is blurry.  The chairs in the background are more in focus, but you try seeing how the picture is going to look with a small 2.5" screen!  My eyes are good, but they aren't bionic! Lol...)

 As promised, here's the little card that fits in the front pocket of the purse.  Simple and sleek.  I love it!  Sometimes I tend to...shall we say over-embellish?  So it's nice to see that I can still create something simple and stylish.  It only pained me a tiny bit not to add bling to this card, but I justified the lack of bling by telling myself that the paper was already glittery. :)

Enjoy!  I look forward to seeing you all at the next class.  What's the next project, you say?  You want a hint?!?  Okay just twist my arm then!  Think cards, multiple cards, and caps, gowns, and diplomas.  That's all you get.  I can say no more!

Wednesday, April 7, 2010

April 2010 Class: Purse-fection!

This month's Girls Stampin' day class will take place on April 18th, which is a Sunday, at 1pm.  (Please contact me for more details about the location.)

As an ode to the children's book My Mommy's Tote, we'll be making a sweet little purse filled with recipe cards in honor of Mother's Day (which is coming up fast on the 9th of next month!).  A cute little way to say I love you to the "Moms" in our lives.  (*Note: Original purse idea from Becky Roberts.  Your designs totally rock my socks!)

All Moms love recipes, right?  Well at least my Mom does...but if your Mom doesn't you can always use the purse as a box for her gift and keep the recipe cards for yourself (Don't worry, I'll be sure to share some of my favorite recipes with you guys!).  Score two gifts in one!  (I'm still working on jazzing it up with some decorations and a cute little card that will fit in the front pocket of the purse...and you thought that I was ahead of the game this month...April Fools on you...lol.)  


Picture from the front

Picture from the back
The class fee is $20, which includes your kit with pre-cut pieces, all shared supplies (stamps, scissors, etc.), and a super yummy snack.  If you are unable to attend the class or live outside of the island of Oahu, please include $5 for shipping.  Please RSVP to me by Monday, April 12

*If you'd like to share a recipe with the group please email it to me with your RSVP.*

Don't be shy!  Encourage a friend(s) to come along.  More girls means more ideas and more fun shared together!  Just be sure that they RSVP to me or you can RSVP for them.  Also, if you are unable to attend, but still want to do the class you can purchase a kit ($25, including the $5 shipping).  Looking forward to seeing you all!

Stampin' and bloggin',
          Arielle

Monday, April 5, 2010

Cat Nap...

Ditto, this is an intervention.  You're out all hours of the night.  I just can't get through to you any more.  So I have to do it...

This is what you look like after a night of partying a little too hard.  You know...those nights where you were, shall we say, over-served?  You spend all of your days napping and all of your nights out prowling.  Sure you looked hot the night before shaking your tail, but now look at you.  Was it worth it?

Response: "Meow."

Here's the Easter Rabbit, Hooray!

"Gooses, geeses!  I want my geese to lay golden eggs for Easter!"- Veruca from Willy Wonka and the Chocolate Factory

 
So these eggs aren't exactly golden, but they are pretty darn cute!  My Mom loves to color Easter eggs, so each year she, my husband, and I color at least a dozen.  It's mostly my Mom and I coloring because my hubby takes forever to color each egg.  (See the one with all the little yellow lines and the one with the teal triangles?  Yup, those are his...see why it takes him so long?)  We colored for a total of 2 hours and my husband only colored 3 eggs!

Why are the eggs so shiny, you ask?  Let me tell you why...lol.  My Mom decided that she likes the eggs when they first come out of the dye and they are all shiny and bright.  She brainstormed and came up with the idea of rubbing them with a drop of canola oil to keep them shiny...lol.  Does it really work, you ask?  The answer is yes and no.  Yes, it is shiny while in the box when it is first done.  No, it does not stay shiny because the cardboard box absorbs the oil as it sits in the refrigerator...lol.  Needless to say, she was very happy with the results for the time being.  Plus it was funny to see people's faces when they saw the shiny eggs...the general response was "Oooh nice eggs...hey wait, why are they so shiny?".

Another Easter memory...lol. :)  

Happy 26th B-day my wonderful Hubby!

Okay so this is a little late for a post since it happened over two weeks ago...yeah, yeah no wife of the year award for quick posts...lol.  But I'm sure that he knew of my procrastination issues long before he married me.

I think that this, on the other hand, qualifies for wife of the year points!

This is the chalkboard at the entry point of our little community where we live.  (Yes, they have a chalkboard for posting important messages about our community...yes people still use writing, actual handwritten messages, as a form of communication...shocking I know...lol.)  Usually people write things about community events, great housekeepers (man do I wish that I could afford one of those!), and occasionally birthdays.

I made up my mind that I was going to write a b-day message for my husband.  The day before his birthday, I got in my car and drove to the store and bought the colored chalk.  I then drove to the chalkboard, fully equipped with a bottle of water and paper towels to wipe off the previous message, and stood there planning out my message...only to be greeted by a million mosquitoes!  (That's what you get for living in the mountains...I know, I know!)  So I quickly wrote out the message, plain and simple, all while swatting away the evil blood-sucking beasts.  My original intentions were to just write "Happy Birthday La'akea", which I happily wrote out.  Then I took a step back to review my wonderful art work and realized that "Happy" and "Birthday" were too far apart...so "26th" got thrown in at the last moment...lol.  (Hey, I figure we are still young enough to announce ages...at least until next year...lol.)

Cheers!  His birthday dinner at Yard House. :)

So who loves you, baby?  Yeah that's right, I do! :)

Wednesday, March 17, 2010

Yummy Chocolatey Goodness!

Okay so I know that I should be hard at work on all of those kits for the up coming class, which I will go and do in a few minutes, but I couldn't pass up the opportunity to spread the great news.  So here it goes!  I was blog hopping at work the other day (Hey, I was on a break!  Lol.) and came across a recipe for chocolate cake.  Not just any chocolate cake, it's 'the best chocolate sheet cake ever'!  It's even called that.  So I've been thinking about said cake for days now, trying to persuade myself why I need not make this cake or 'the best frosting I've ever had' that goes with it.  After only one day my will power was broken and I was in my Mom's kitchen this morning slaving away...lol.  I made both the cake and the frosting and I enjoyed every minute of it. :)  And you know what?  It was indeed THE BEST chocolate cake and butter-cream frosting that I have ever had!  (For those of you who know me, I'm not a huge butter fan, but in this frosting it's pretty darn tasty.  Yeah there's a whole cup and I used the real stuff too, none of that mmm it tastes like butter but it's really not...lol.) 

 The best cupcake you'll ever eat.  Other cupcakes, eat your heart out!

Damn the scale today!  I'm eating cake!

Thursday, March 11, 2010

Mwahhh-haha! My craftroom is almost complete!

My paper trays that I ordered have finally come in!  (It sounds like I had to wait forever but I really just ordered them on the 7th...lol.)  Well at least one of them came in.  I am still waiting for the other one to come in the mail.  It'll probably come tomorrow...cross your fingers for me. :)

I searched far and wide for a paper tray system.  One with efficient storage capacities that still takes up a small amount of space.  There were many to choose from, but I felt that this one best went with the modern, yet eclectic, decor of my home...oh who am I kidding?  I bought the cheapest one that looked like it wasn't going to break about 5 minutes after being assembled...lol.  (Yes it's been longer than 5 minutes and the paper tray system is still standing...haha very funny.)

Here's the view from the front
And the side

A picture of the box...see I put it together correctly :)

I put it together all by myself!  My husband will be so proud...well he'll mostly be relieved that I didn't ask him to build it...lol.  It only took about 20 minutes to put together and I only got hurt once (That's pretty good for me!  Assembling things = injury every time).  One of the bolts that holds on the wheels had a sharp spot on it and of course my finger found that exact spot with little to no effort...lol.  (Don't worry I washed it with soap.  Hey, you can never be too careful.  Plus the system was really dusty in the box.  I should have wiped it down, but I just couldn't wait to put it together!)  

If you would like to buy one, I bought mine from Target online for $29.99 and about $6.00 for shipping.  (On a tangent, the store's name is pronounced Target, like 'I'm going to shoot at this huge red and white target', not Tarje.  It's a big box retailer not a French boutique...lol.)  Like I said before, it was the cheapest and looked like it would hold my paper with minimal issues.  Plus it has wheels, so I can wheel it all over the room if I want.  I just hated having to dig through my scrapbook chests looking for paper.  Now I can just wheel these babies right next to my desk.  Voila!  Paper at my finger tips!  

Now all I need is a mini fridge in my craftroom and I can live in there for days...lol. :)

Tuesday, March 9, 2010

March 21, 2010: Mini Milk Carton and Card Class


Okay so now it's time for the big reveal...the class that you all have been waiting so patiently for is finally upon us!  This month we'll be making the cutest little Easter treat holder that you have ever seen. :)

The milk cartons are made with the new SU mini milk carton die for the Big Shot (I LOVE mine!  If you don't have one yet you need to put it on your must have list.).  The carton holder is a variation off of the one that Ruth Norton created (You go girl!).  This project takes a little brain power, but it's easy none-the-less.

Here's a close up of the side of the holder and the individual milk carton:
Cute, cute, cute, right?!?  We'll also be making a card or two to go with this gift.  Maybe a set of 3x3 cards!  I'll work my magic and see what I come up with.  :)

I can't wait to make them with you all on Sunday, March 21, between 1-4pm.  RSVP by Monday, March 15.  Class fee: $20 (plus $5 shipping if you can't come to the class or pick up your kit from me).  Please contact me personally for more information on the class.

Hope to see you there!

Wednesday, March 3, 2010

Ahhh those were the days...

WARNING: A mushy moment is about begin... don't say that I didn't warn you...lol.

March will always have a fond spot in my heart.  Not only is it the month where spring finally begins, but it is the month where my husband and i started dating and, 9 years later, finally married.   March 16 to be exact!  :)  *Insert "Aawwww...so cute! and a huge smile here*  This year will be our first anniversary.  Just think last year I was pulling my hair out trying to balance a wedding budget.  A blog wasn't even close to being on my mind...lol. 
Our first dance!  We were so young...wait that was only last year...lol.

Now looking back on my wedding photos (Props to Carol Oliva photographer extraordinaire!  She's a rockin' photographer and a super sweet lady.  Put her on your list of vendors for your next party.  You won't be disappointed!), I can see that all that stress was worth it.  We had a great time and I can honestly say that it was perfect.

Just to bring this back to stationary (my second love, since my hubby would have to be my first...lol.  Although there are some days that the order feels like it should be switched...just kidding.), here's a photo of our wedding invitations:
 

I came up with the design and my husband did the computer-ie parts  of the invite (The wording and the background paper.  Yes he designed his own background paper because he didn't like what I chose from the store...and he says that I'm obsessed...lol.)  My mom and husband started calling me the invitation nazi because i wanted them to be perfect.  Each time they stuck something together even 1/16 of a inch off I would make them do it again.  (Told you I was crazy about stationary...and you thought I was just kidding.)   Well I didn't make them do it again every time...I just gave them the eye.  I think that they even started putting the 'ugly ones' at the bottom of the pile so that I wouldn't see them until later...lol.  Ahhh memories... :)
*All photographs from this post were taken by Carol Oliva.